
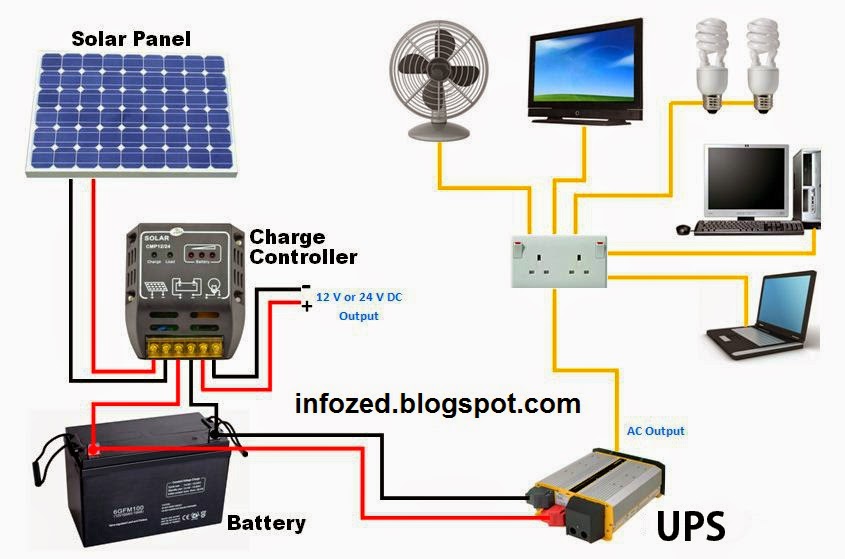
Installing an off grid solar power system step by step:
Four items are required in order to have a complete working solar power system: a Solar Panel, solar controller, a Deep Cycle Battery, and an Inverter. Now before you think Oh that’s just too complicated…It’s really as easy as hooking up a DVD Player to a TV then plugging everything in. Let me explain: if you wish to hook up solar power to some off grid application like a tiny house, tool shed, a few lights, RV, battery charging etc then keep reading I will explain how to hook up a complete off grid small solar power system step by step.
First Step: The Solar Panel:
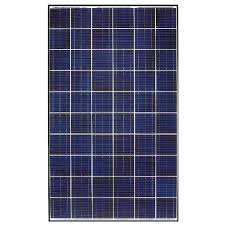
The first thing you’ll need to purchase is a solar panel. Obviously, you have to have a solar panel in order to “make” the electricity you wish to use for your off grid application. Now this begs the next question, “What size solar panel(s) do you need?” OK, for small applications you may be able to get by with one 100watt 12 volt solar panel or two 100w solar panels, however you may just want to buy only one 200w 12v panel to save space instead of getting the two 100w solar panels. Make sense? Also you can go higher with the wattage (400w, 600w, more) if you wish, but with the rise in wattage comes a rise in the price. (Most higher wattage are for the residential or commercial applications that would be used to power full sized residential homes or businesses and certainly not necessary for a small shed or appliance spoken about within this article. A good rule of thumb is to buy a solar panel between a 100w to 200w 12v panel. Now solar panels are getting cheaper and cheaper and are finally under $1 a watt. (So you can find a 100 watt panel for under $100) Here are some prices to compare on Ebay or Amazon since most people are members. I found these to be the cheapest on the web.
But how do we use the 12v to 18v of DC electricity produced by the solar panel? Simple, It must be first “controlled” or hooked into a Solar Charge Controller.
Second Step: A Solar Charge Controller:
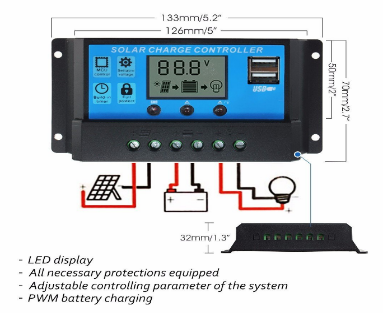
A solar controller’s function is to “control” the electricity made by your solar panel(s) and “route” it to make it useful and safe. A solar controller usually has 3 sets of positive (+) and Negative (-) terminals on it. The first set is a (+) (-) terminal where the (+) (–) wires coming from your solar panel are hooked up there.(see diagram). Next set of terminals usually is the (+) (-) hookup for the Deep Cycle Battery (More on this below). This is simply a connection between the (+) (usually red terminal of the battery to the (+) terminal of the solar charge controller and then the (-) terminal of the Battery to the (-) terminal of the Solar Controller. This will route the excess voltage made from your solar panel(s) to your deep cycle battery for storage. This will keep the battery(s) charged or charging thus storing the excess solar energy. (More on this below) Think of the Solar controller like a DVD player that takes what you put in it and produces usable images with it. Lastly, there is a Load (+) and (-) terminal on the charge controller, which if you had a 12v DC device you can hook it up directly where the (+) (-) terminals are. The solar controller should come with over charging protection circuits in order for the battery not to become over charged protecting the battery or batteries you have in your off grid solar system. This is the most important function of the solar controller.
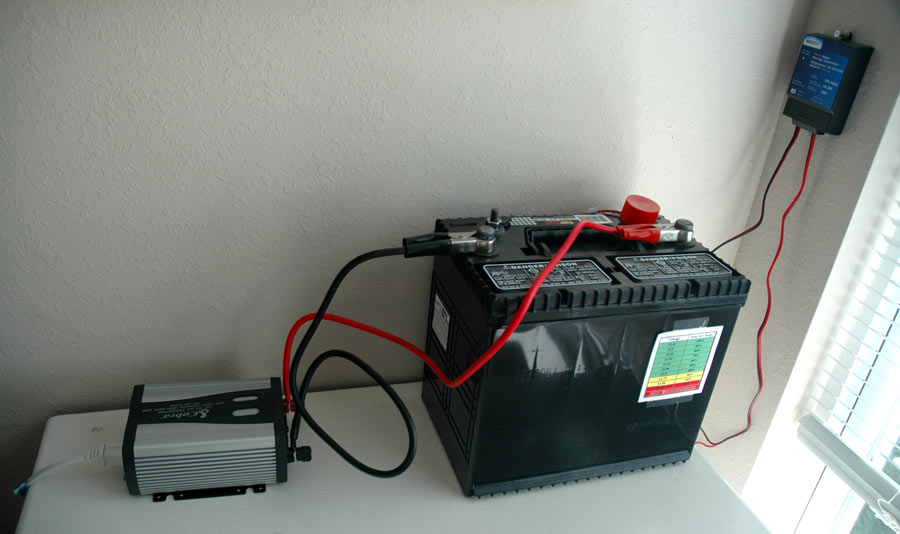
Third Step: Deep Cycle Battery:

A battery is a battery and we all know what they do, but for solar applications you will need a 12v deep cycle battery. This means that this battery is designed to deplete its power and then recharge again over and over again. What a Deep Cycle battery does for your off grid solar system is it takes the extra power produced by the solar panel(s) and through your solar controller, charges the battery allowing it to power what it is that you wish to power through the night or on cloudy days. Without a battery “backup” in place then your solar panel(s) and controller will only be useful during sunny days. This is just not practical. If you have a battery in your system then it will keep your appliances running when the sun is not out. However, as we all know batteries grow weaker with use and become drained. So yes, this will happen with your solar deep cycle batteries as well. Here’s what you need to figure. When purchasing a deep cycle battery, the most import thing to look for is it’s Amp Hour rating. Let’s say a battery is rated for 55 Amp Hours for example (or 55AH) Then what this means is simply that this battery if directly hookup up to a 1 Amp device can power it continuously for approx 55 hours until its dead.
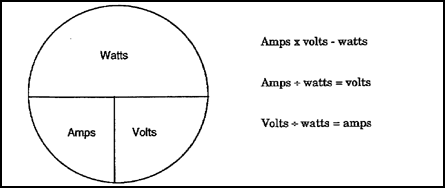
So if you want to run something that is 10 amps then a 55AH battery would last approx 5.5 hours etc. So it is important in sizing your battery(s) to find out the Amperage of what it is that you plan to run. More than not the Amperage is listed on the appliance itself however if it is listed in watts you can simply divide the wattage by the amount of electricity the device uses to get the amps.
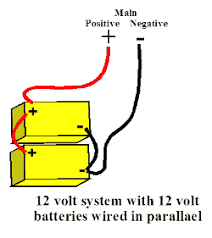
Many solar systems include two or more Deep cycle batteries connected in parallel (See pic below) which increases the storage capacity without increasing the voltage output. In other words you will still have 12volts coming from your batteries to use but your amp hour goes to 165 AH if each one is rated 55 AH. You can purchase a deep cycle battery or a cheaper option, like a golf cart battery, or marine battery. These are designed for charging and depleting over and over again and have high Amp Hour ratings. These are perfect for solar use. (Car Batteries are not ideal for solar use as they are not made to totally deplete) Good rule of thumb is spending around $2 an Amp Hour for a deep cycle battery.
Step Four: The Inverter:
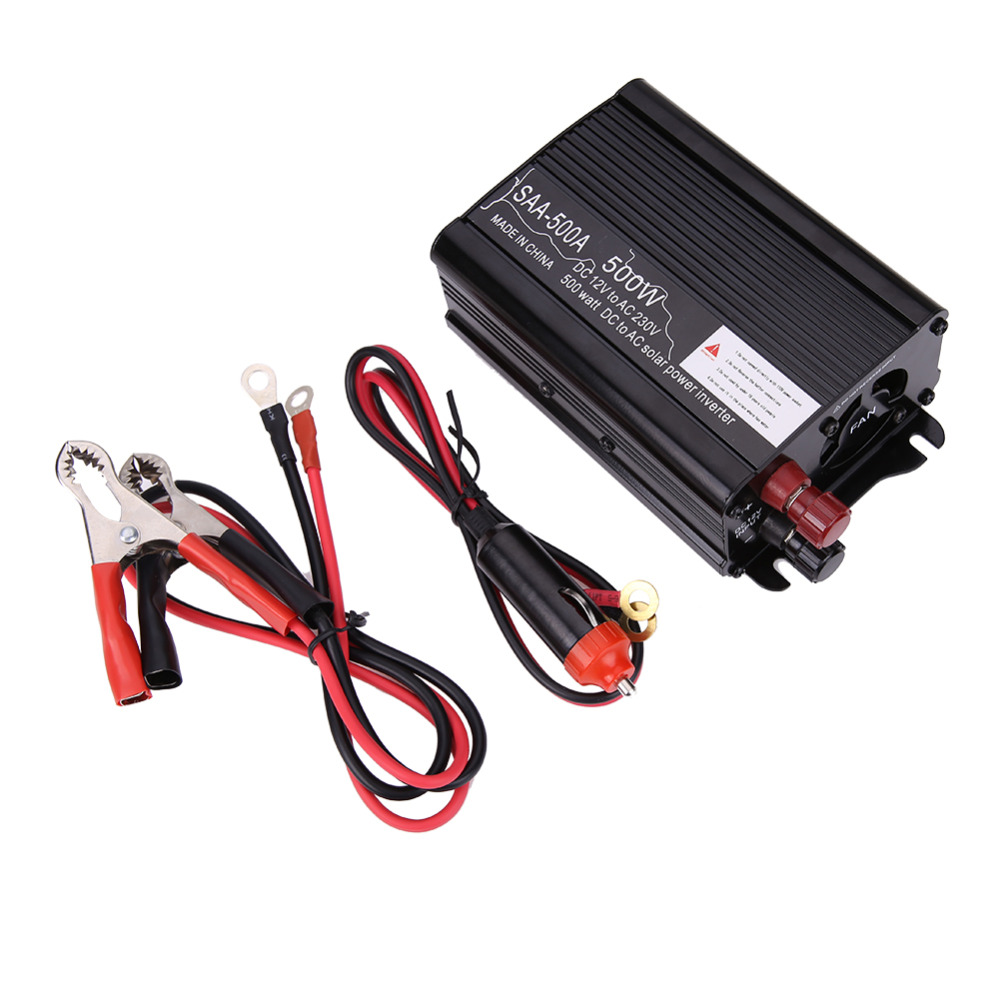
The inverter is where the magic happens. What is coming out of your solar panel is only 12 volts to 18 volts of DC (Direct Current) so this is not sufficient enough to run a standard 110v AC (Alternating Current) light bulb or a small 110v AC appliance such as a drill, refrigerator, light bulb etc which would run off of the 110v AC outlets of your home. What an inverter does is it takes (or inverts) the 12v DC coming from the 12v battery and inverts it into a usable 110 AC volt current which is exactly like what’s coming out of your home plugs thus making it usable to run what you are looking to run. Most inverters come with a red terminal (+) and black (-) terminal on its back side. The (+) red wire hooks up to this directly from the pos (+) terminal of the Deep Cycle battery and the Negative (-) Terminal of the Inverter to the Negative (-) Terminal of the battery. The reason the inverter is hooked up directly to the battery is so that the inverter will work even if the solar panel or solar controller is not producing like during a cloudy day or at night. In other words the real function of the solar panel and the charge controller is to charge the battery enough to make it last longer so that your electric applications will run long enough to be useful. You should never hook a solar panel directly to an inverter because it will not be consistent in powering your device. However what the solar panel will do is through the controller it will keep your battery at full charge during sunlight hours and thus you will have usable power when night comes or during cloudy days.
What size inverter should you buy. The simple answer is between 500w and 1500w pure Sine wave inverter. Obviously, you will need to find out the total wattage you intend to power through your system and then buy the size up from these wattage needs. If you intend to run 200watts, then buy the 500 watt Inverter. If you intend to run 500watts perhaps you could go with the 1000 watt inverter. Just make sure the size of your inverter is enough or more of the wattage you intend to power. Make sure you purchase the sine wave inverter instead of the modified inverter. The reason is the sine wave matches the 60hz that comes from your home plug allowing CFL lights, laptops, TV’s etc to run the way the were intended.
Complete setup diagram:

